
Installing Landroid is easy and even easier if you have made a clear idea of what you need to do. A proper planning will also help you avoid mistakes or having to rework the installation once it’s done.
Charging station
The charging station is where your Landroid goes to have its battery recharged. It’s also the parking lot where it rests in between one mowing session and the next.
Locate a proper position for it, bearing in mind:
• It needs to be powered, so it should be no more than 10m away from an AC mains outlet
• If possible, choose a shaded position as batteries and chargers don’t like over-heating
• The base needs to sit on flat land to ensure effective docking
• Avoid places close to irrigation sprinklers
You can place the charging station on your lawn or on a hard surface like a walkway, provided that the lawn and the hard surface are at the same height (no steps).
Boundary wire
Landroid’s boundary wire is the perimeter inside which Landroid will mow. It is designed to stay on the surface of your lawn. Nearly invisible from the first day, it will be engulfed in the soil in a few weeks. If you will want to bury the wire, it is recommended to first peg it down and test the installation is successful by running Landroid over the perimeter.
This allows you to easily check everything and, if necessary, change the layout before burying the wire. Bury the wire no more than a few centimetres below ground level, so that the wire ensures good signal.
The wire has to be placed at a certain distance from the edge of the lawn. This distance changes depending on what’s on the other side of the edge. Different parts of your lawn may border different scenarios:
1. If the edge of the lawn borders a step: keep the wire 26cm from the edge.
2. If the edge of the lawn borders a path at the same height: keep the wire 10cm from the edge.
3. If the edge of the lawn borders gravel: keep the wire 26cm from the edge, as Landroid’s wheels may slip on gravel.
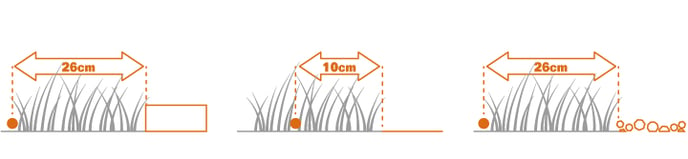
If a side of your lawn borders a neighbor’s lawn with a robotic mower in use, lay your wire 1m apart from your neighbor’s wire to avoid possible interference.
Identify forbidden areas and obstacles
You don’t want your robot mower to behead flowers, dive into a water feature, or shred tree roots that emerge from the ground. Locate these areas and surround them with boundary wire to prevent Landroid from accessing them.
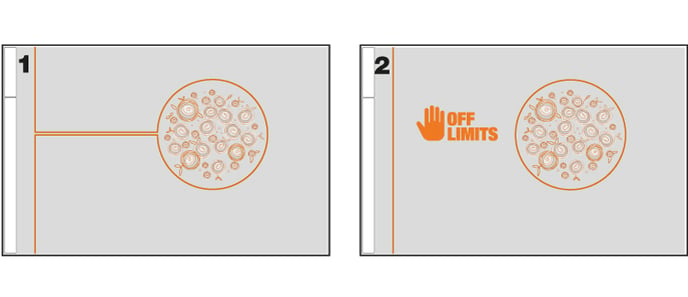
The boundary wire is a single loop connected on both ends to the charging station, so you will have to depart with the wire from the border, surround the area you want to protect, then take the wire back to the border as illustrated here in fig. 1.
If areas to be surrounded are far away from the border of your lawn, or if you have several areas and tree roofs to protect, this traditional method is time consuming. A great alternative - only for new Landroid models (WR130E, WR139E, WR140, WR140E, WR141E, WR142E, WR143E, WR147, WR147E, WR147E.1, WR148E, WR149E, WR150, WR150E, WR153E, WR155, WR155E, WR165, WR165E, WR167E, WR184E) is to use Landroid’s Off-Limits option.
With the Off Limits option, you simply set a digital fence around the forbidden areas , which does not need to be connected to the boundary loop (fig. 2). The Off-Limits digital fence is also great to protect seasonal equipment (e.g. a trampoline) or in case you temporarily change to the layout of your lawn. Learn more here.
Landroid’s bump sensor can manage solid obstacles such as trees, furniture and the like, which don’t need to be surrounded by wire.
New Landroid models (WR130E, WR139E, WR140, WR140E, WR141E, WR142E, WR143E, WR147, WR147E, WR147E.1, WR148E, WR149E, WR150, WR150E, WR153E, WR155, WR155E, WR165, WR165E, WR167E, WR184E) can be equipped with ACS option, an intelligent ultrasonic auto-pilot that makes your Landroid steer around obstacles instead of bouncing into them. Read more on ACS option
Once you have considered the elements above on your plan you can then proceed with the positioning of the charging base
Articles series:
- Landroid installation plan
- How to properly place the charging base
- How to lay down boundary wire
- How to connect Landroid to Wi-Fi