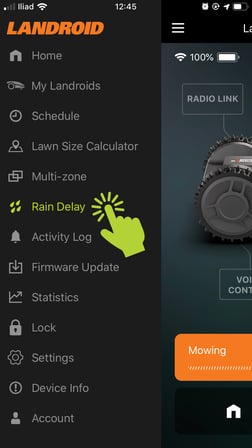
How to set up rain delay
How does rain delay work and how to make the best of it.
Landroid is 100% weatherproof and it's as outdoorsy as it gets. That said, mowing wet grass does not yield the best results. This is why we equipped Landroid with a rain sensor which detects rain so the robot stops mowing and goes back to its charging base.
How does it work?
When the rain sensor detects water, the robot goes back to the charging base. Rain Delay begins once the sensor is no longer wet. It is set to 180 minutes by default, but you can disable it or change it via Landroid App or through the display. Once the delay is over, Landroid will start mowing again according to its schedule.
Occasionally, you might want Landroid to mow before the Rain Delay is over: in this case simply turn it off and then on again.
If you live in an area with heavy rainfall, it might be useful to adjust the rain delay setting to allow Landroid to operate even when the grass is wet. It's not ideal, but it might still be better than not mowing at all.
Please be advised that if you live in an extremely wet area, humidity might accumulate on the sensor and activate it even if it's not raining. If this is the case, you will have to play around with the settings in order to balance Landroid operations.
Setting rain delay
Setting rain delay via app
Please access the Rain delay function from the app menu and chose your desired settings.

Setting rain delay via display
Depending on which Landroid model you have, please refer to the following tutorials:
- Landroid M, L (LCD display + Knob): WR147, WR147E.1, WR148E, WR149E, WR165, WR165E, WR167E
To do this follow these steps:
1. Turn Landroid on.
2. Clockwise rotate the knob to select the gear icon, then press the knob to confirm.
3. Go to ‘Rain start delay’ option by clockwise rotating the knob , then press the knob.
4. You will now see the default rain delay of 3 hours.. Press the knob to edit this timing.
5. Rotate clockwise or anti-clockwise the knob to increase or decrease the rain delay.
6. To remove the rain delay completely, select 00 hours and 00 minutes.
7. Then press back button to exit - Landroid M, L (LCD display): WR140, WR140E, WR142E, WR143E, WR150, WR150E, WR153E, WR155, WR155E
To do this follow these steps:
1. Turn on Landroid and insert PIN code
2. Press the → (D) key and press OK to select the gear icon into the ‘General Settings’ menu
3. From the ‘General Settings’ menu go to ‘Rain start delay’ option by pressing the ↓(B) key, then press OK
4. You will now see the default rain delay of 180 min. Press OK to edit this timing
5. You can use the ←(C) and →(D) arrows to select the digits and ↑(A) and ↓(B) arrows to increase or decrease the rain delay
6. To remove the rain delay completely, select 000 min.
7. Then press back button to exit - Landroid M, L 2016/2018:
WG754E, WG755E, WG756E, WG757E, WG758E, WG790E.1, WG791E.1, WG792E.1, WG793E.1, WG796E.1, WG797E.1, WG798E, WG799E, WR111MI, WR112MI, WR113MI
Follow the simple steps below:
1. on general setting menu choose "Rain start delay" option, using the arrow keys, then press OK to confirm

2. press ok again and when numbers blinking, input the number of minutes from 0-180min using number buttons on keypad.

If the delay time is setting to "0", Landroid will continue mowing also in case of rain.
- Landroid S 2017/2018:
WR100SI, WR101SI, WR101SI.1, WR102SI, WR102SI.1, WR103SI, WR104SI, WR104SI.1, WR105SI, WR105SI.1, WR106SI, WR106SI.1, WR110MI, WR110MI.1, WR115MI
Setting is available only via app as per above instructions
-
Landroid S Basic: WR090S, WR091S, WR092S, WR093S, WR094S, WR095S, WR096S. On those models you cannot change the rain delay setting.
- Landroid S, M, L (LED Display): WR130E, WR139E, WR141E, WR147E and WR184E
Setting is available only via app as per above instructions
Rain sensor and ACS
Once Rain sensor detects rain, the ACS module – if you have it installed - will be automatically turned off to prevent ACS from recognizing heavy rain as an obstacle.
